# Fixing KASLR slide values
- Supported version: 0.6.5
This section is for users who wish to understand and fix "Couldn't allocate runtime area" errors. This is most common with either Z390, X99 and X299. This section will also support Clover as the info is also useful for them.
# So what is KASLR
Well KASLR stands for Kernel address space layout randomization, what it's used for is security purposes. Specifically, this makes it much harder for attackers to figure out where the important objects are in memory as it's always random both between machines and between boots. More in-depth explainer on KASLR
Where this becomes an issue is when you introduce devices with either small memory maps or just way too many devices present. There likely is space for the kernel to operate but there's also free space where the kernel won't fit entirely. This is where slide=xxx fits in. Instead of letting macOS choose a random area to operate in each boot, we'll constrain it to somewhere that we know will work.
# And who is this info for
Well as I mentioned earlier, this is for users who don't have enough space for the kernel or moves to a place that is too small. You'll generally experience an error similar to this when booting:
Error allocating 0x1197b pages at 0x0000000017a80000 alloc type 2
Couldn't allocate runtime area
With some variation:
Only 244/256 slide values are usable!
Or even crashes while running macOS:
panic(cpu 6 caller 0xffffff801fc057ba): a freed zone element has been modified in zone kalloc.4096: expected 0x3f00116dbe8a46f6 but found 0x3f00116d00000000
The best part about these errors is that they can be random, also the reason why power cycling your PC 20 times also can fix the issue but only temporarily.
Fun Fact: It takes around 31 ms to find an area to operate in, manually setting a slide value can on average can reduce boot times by 0.207%!!!
# So how do I fix this
The real fix to this is quite simple actually, the process is both the same for Clover and OpenCore users. What you'll need:
Clover users:
- Clover Shell(most users already have this included, usually called shell64.efi or some variation)
- This will be found under
EFI/CLOVER/tools - If you're missing this, you can grab it from the CLOVERV2-xxxx.zip
- This will be found under
- OcQuirks since Clover v5210 by downloading the .zip CloverV2-xxxx.zip it is included under /CloverV2/EFI/CLOVER/drivers/off/UEFI/MemoryFix/OcQuirks.efi, this needs to be coupled with OpenRuntime.efi which is provided in the same path
(Don't mix Aptio fixes together or use OsxAptioFixDrvX, AptioMemoryFix, only OcQuirks is supported in this guide)
- Make sure this is inside
EFI/CLOVER/drivers/UEFI
- Make sure this is inside
- OpenRuntime.efi(Bundled with CloverV2)
- Make sure this is inside
EFI/CLOVER/drivers/UEFI
- Make sure this is inside
OcQuirks.plist(Bundled in Clover's config.plist, in last section afterSystemParameters). To change OpenRuntime quirks, check the end of the config-sample.plist from CloverV2-xxxx.zip, since Slice merged ReddestDream's OcQuirks.plist in Clover's config.pist
- Clover Shell(most users already have this included, usually called shell64.efi or some variation)
OpenCore users:
- OpenRuntime
- OpenShell(Don't forget to enable this under
Root -> Misc -> Tools)
And we'll also need to configure our config.plist -> Booter(for OpenCore) or OcQuirks.plist(for Clover):
- AvoidRuntimeDefrag: YES
- Fixes UEFI runtime services like date, time, NVRAM, power control, etc
- DevirtualiseMmio: YES
- Reduces Stolen Memory Footprint, expands options for
slide=Nvalues and very helpful with fixing Memory Allocation issues on Z390.
- Reduces Stolen Memory Footprint, expands options for
- EnableSafeModeSlide: YES
- Allows for slide values to be used in Safe mode
- ProtectUefiServices: NO
- Protects UEFI services from being overridden by the firmware, mainly relevant for VMs, 300 series and newer systems like Ice Lake and Comet Lake
- ProvideCustomSlide: YES
- This makes sure the kernel will only choose good regions and avoid those that may result in boot failures. It's still random but omits those bad regions in its randomization
- RebuildAppleMemoryMap: YES
- Generates Memory Map compatible with macOS, can break on some laptop OEM firmwares so if you receive early boot failures disable this, this makes sure our memory map will fit to what the kernel expects
# Prepping the BIOS
The reason we need to reset the memory map is we want it to be more deterministic, what I mean by this is that there will be less variation on each boot so we have fewer edge cases(Memory Maps are not always consistent on boots). To prep:
- Update BIOS(extremely important as early BIOS's shipped are known to have memory map issues, especially with Z390)
- Clear CMOS
- Enable much needed BIOS settings:
Above4GDecoding: This allows devices to use memory regions above 4GB meaning macOS will have more room to fit, can be problematic on some X99, X299 so recommended to test with and without.Boot Options -> Windows8.1/10 mode: This will make sure no old legacy garbage is loaded. Fun fact,other OSis only designed for booting older versions of Windows and not for other OS.
- Disable as many unneeded devices in the BIOS(this means there is less variation in the map on each boot, so fewer chances of boot failure). Common settings:
CSM: For legacy support, adds a bunch of garbage we don't want. This also can break the shell so you can't boot into it.Intel SGX: Software Guard Extensions, takes up a lot of space and does nothing in macOS.Parallel Port: macOS can't even see parallel.Serial Port: I'd like to know how many of you are debugging the kernel...iGPU: Not ideal but some systems have such bloated maps that the iGPU just can't fit.Thunderbolt: Many hacks don't have thunderbolt working, boards that don't have thunderbolt but have this option just waste more space.LED lighting: Sorry mate, time to go.Legacy USB: More Legacy Crap.
# Test boot
With our adjusted EFI, config.plist and BIOS settings, it's time we try out our new setup. If you still have issues, well it looks like we'll need to do a deep dive and calculate our slide value
# Finding the Slide value
Now what you'll want to do is open the EFI shell in your boot manager of choice and run memmap. This will give you a list of all pages and their sizes. This is where the fun begins.
Example of what you'll see:
| Type | Start | End | # Pages | Attributes |
|---|---|---|---|---|
| RT_Data | 0000000000000000 | 0000000000000FFF | 0000000000000001 | 800000000000000F |
| Available | 0000000000001000 | 0000000000057FFF | 0000000000000057 | 000000000000000F |
| Reserved | 0000000000058000 | 0000000000058FFF | 0000000000000001 | 000000000000000F |
| Available | 0000000000059000 | 000000000008FFFF | 0000000000000037 | 000000000000000F |
| RT_Code | 0000000000090000 | 0000000000090FFF | 0000000000000001 | 800000000000000F |
| Available | 0000000000091000 | 000000000009DFFF | 000000000000000D | 000000000000000F |
| Reserved | 000000000009E000 | 000000000009FFFF | 0000000000000002 | 000000000000000F |
| Available | 0000000000100000 | 000000005B635FFF | 000000000005B536 | 000000000000000F |
| BS_Data | 000000005B636000 | 000000005B675FFF | 0000000000000040 | 000000000000000F |
| Available | 000000005B676000 | 000000006AF77FFF | 000000000000F902 | 000000000000000F |
| LoaderCode | 000000006AF78000 | 000000006B155FFF | 00000000000001DE | 000000000000000F |
| BS_Data | 000000006B156000 | 000000006B523FFF | 00000000000003CE | 000000000000000F |
| ACPI_NVS | 000000006B524000 | 000000006B524FFF | 0000000000000001 | 000000000000000F |
| BS_Data | 000000006B526000 | 000000006B625FFF | 0000000000000100 | 000000000000000F |
| Available | 000000006B626000 | 000000006B634FFF | 000000000000000F | 000000000000000F |
Now you may be wondering how the hell we convert this to a slide value, well it's quite simple. What we're interested in is the largest available value within the Start column. In this example we see that 000000006B626000 is our largest, do note that these are in HEX so if there are multiple values close to each other you may need to convert them to decimal. To the calculate slide value(macOS's built-in calculator has a programming function by pressing ⌘+3):
000000006B626000 = 0x6B626000
(0x6B626000 - 0x100000)/0x200000 = 0x35A
And to verify that this is correct:
0x100000 + (0x35A * 0x200000) = 0x6B500000
Whenever the returned value is not the original(0x6B500000 vs 0x6B626000), just add +1 to your final slide value. This is due to rounding. So for example 0x35A converted to decimal becomes 858 and then +1 will give you slide=859.
But wait for just a second, this is higher than 256!
That is correct, this is caused by memory maps that include Above4GDecoding sectors which cannot be used. So you will need to keep going down the list until you find a small enough value(for us that would be 0000000000100000).
And just to make it a bit clearer on the formula:
(HEX - 0x100000)/0x200000 = Slide Value in HEX
0x100000 + (Slide Value in HEX * 0x200000) = Your original HEX value(if not then add +1 to your slide value)
Now navigate into your config.plist and add your slide value with the rest of your boot arguments(for us it would be slide=0 when using 0x100000). If this value still gives you errors then you may proceed to the second-largest Start value and so on.
Sometimes you may find that when you calculate slide that you receive super small vales like slide=-0.379150390625, when this happens round this to slide=0.
And for users who are having issues finding their slide value can also type $slide [insert largest #Pages value] in the #Sandbox channel on the r/Hackintosh Discord
But this is soooooo hard
Well fret not, for there is a simple solution. After running memmap in the shell, run:
shell> fs0: //replace with your USB

fs0:\> dir //to verify this is the right directory, if not try fs1 and so on

Directory of fs0:\
01/01/01 3:30p   EFI

fs0:\> memmap > memmap.txt
This will add a memmap.txt file to the root of your EFI, you can then proceed to drop it into the r/Hackintosh discord in the #Sandbox channel and type $slide [insert a link to memmap.txt]
# Using DevirtualiseMmio
DevirtualiseMmio is quite an interesting quirk, specifically in that it gets around a huge hurdle with many PCI device systems like some Z390 boards and virtually all HEDT boards like X99 and X299. How it does this is it takes MMIO regions and removes runtime attributes allowing them to be used as space for the kernel to sit comfortably, pair this with ProvideCustomSlide quirk means we can keep the security feature of slide while also getting a bootable machine.
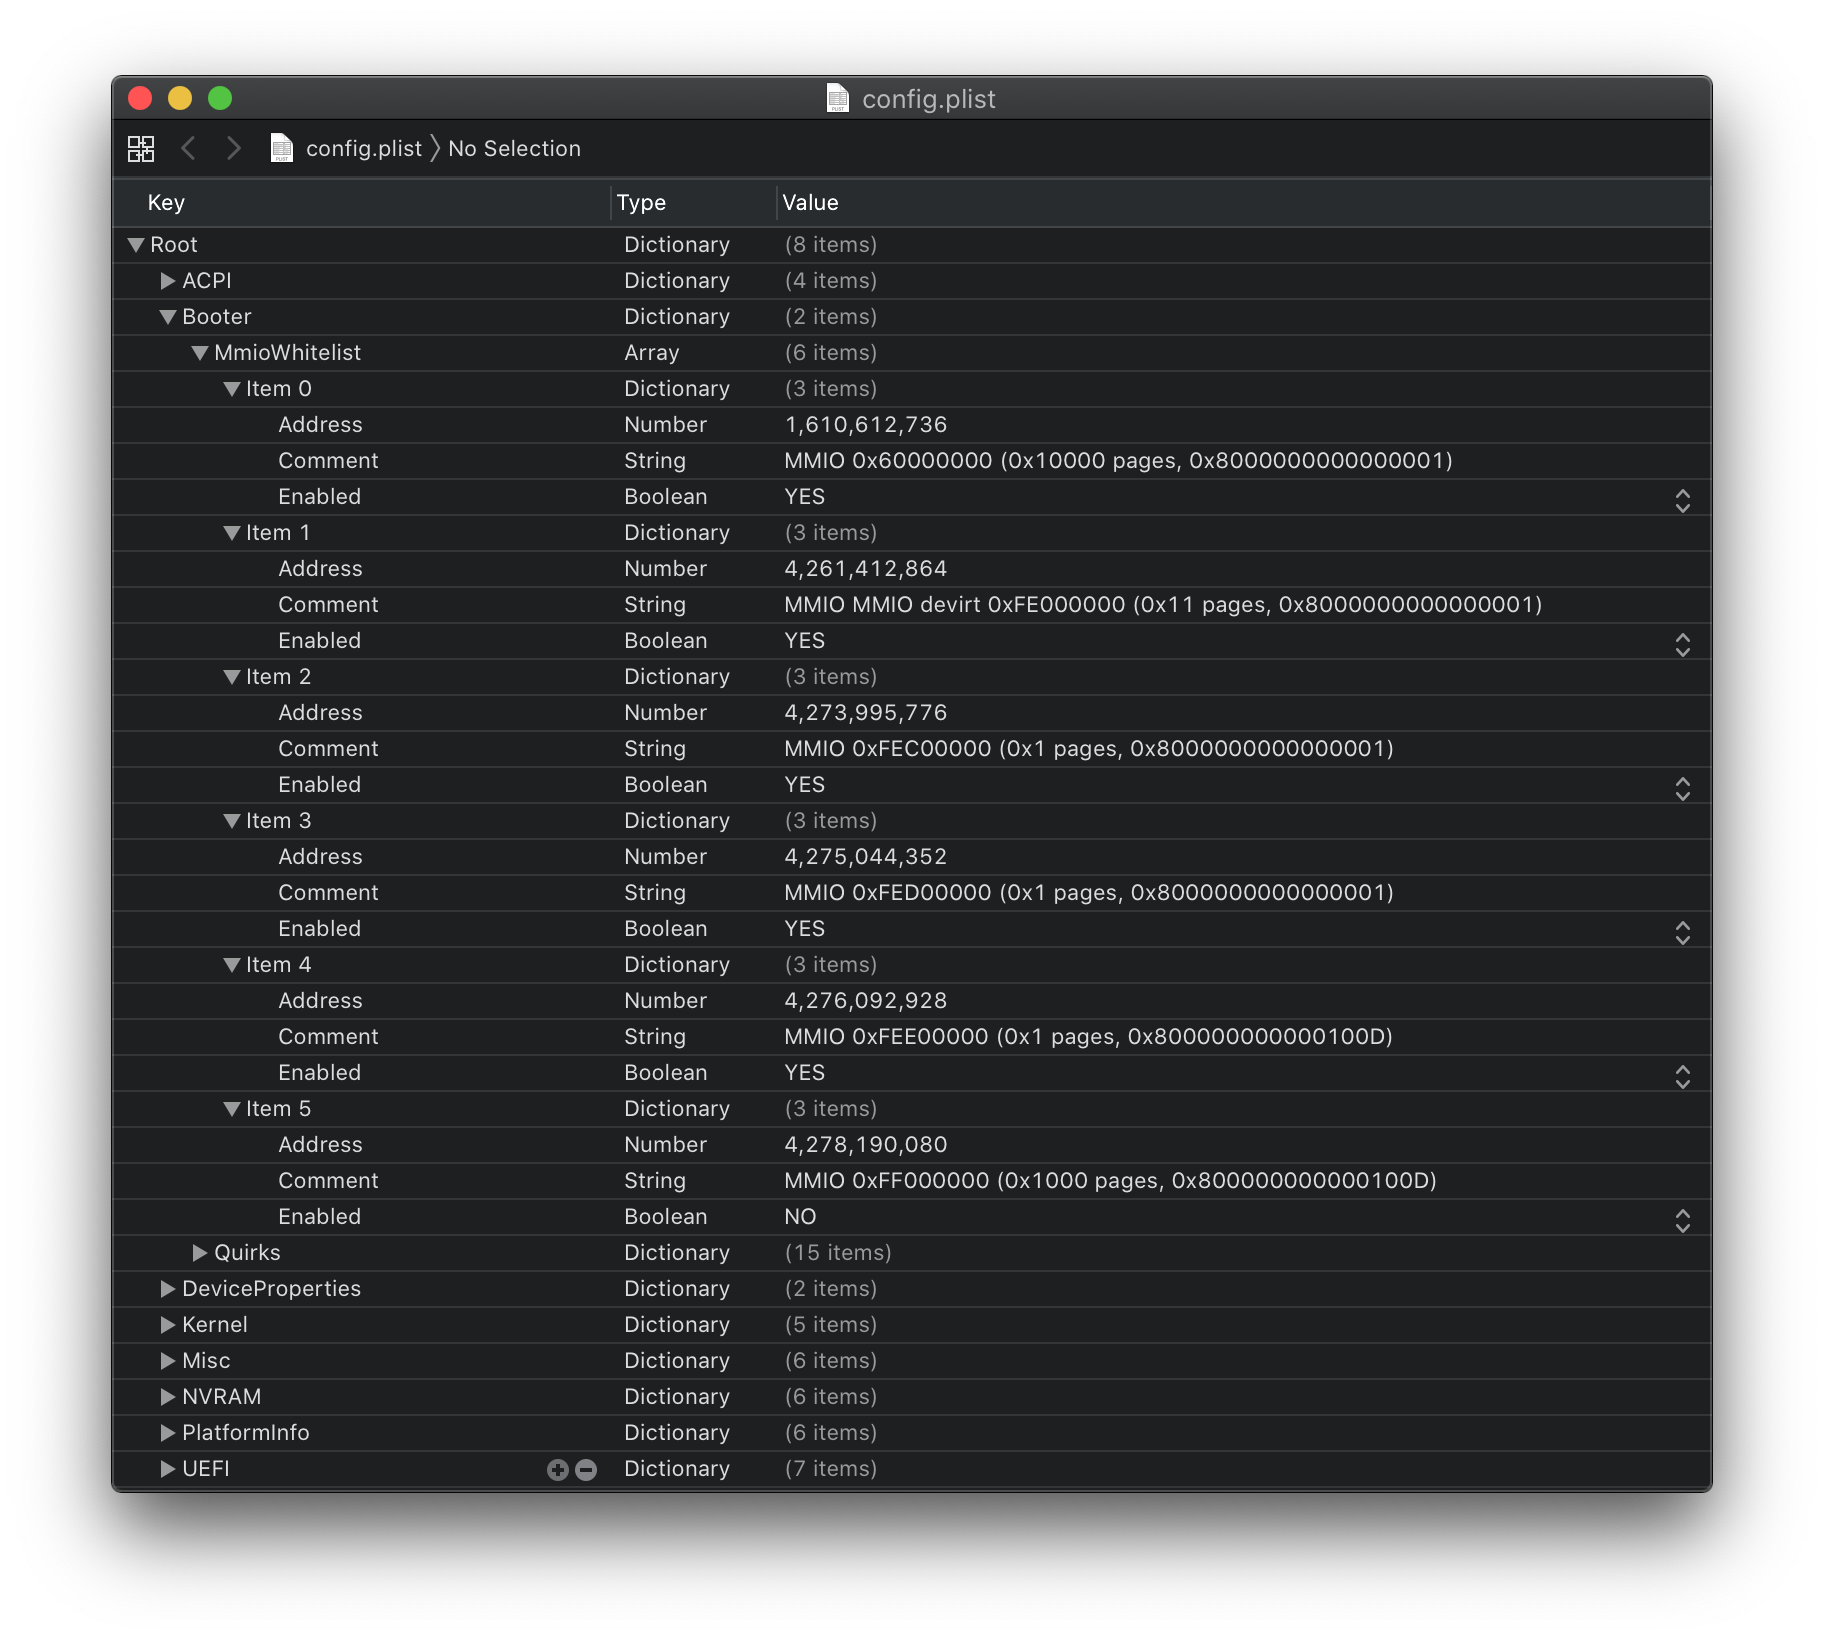
For extremely problematic systems like Threadripper TRX40 19H, we need to find specific regions that aren't required for proper operation. This is where MmioWhitelist comes into play. Note that whitelisting isn't required for most systems
If you run the debug version of OpenCore with DevirtualiseMmio, you'll notice this in your logs:
21:495 00:009 OCABC: MMIO devirt start
21:499 00:003 OCABC: MMIO devirt 0x60000000 (0x10000 pages, 0x8000000000000001) skip 0
21:503 00:003 OCABC: MMIO devirt 0xFE000000 (0x11 pages, 0x8000000000000001) skip 0
21:506 00:003 OCABC: MMIO devirt 0xFEC00000 (0x1 pages, 0x8000000000000001) skip 0
21:510 00:003 OCABC: MMIO devirt 0xFED00000 (0x1 pages, 0x8000000000000001) skip 0
21:513 00:003 OCABC: MMIO devirt 0xFEE00000 (0x1 pages, 0x800000000000100D) skip 0
21:516 00:003 OCABC: MMIO devirt 0xFF000000 (0x1000 pages, 0x800000000000100D) skip 0
21:520 00:003 OCABC: MMIO devirt end, saved 278608 KB
- Note: See OpenCore Debugging on how to enable logging to file
So we have 6 regions we need to go through and see which are bad, best idea is to block all MMIO sections except one and try each region to get a list of good regions.
Now lets take the above example and create our own MmioWhitelist, we'll need to first convert the address from hexadecimal to decimal:
- MMIO devirt 0x60000000 -> 1610612736
- MMIO devirt 0xFE000000 -> 4261412864
- MMIO devirt 0xFEC00000 -> 4273995776
- MMIO devirt 0xFED00000 -> 4275044352
- MMIO devirt 0xFEE00000 -> 4276092928
- MMIO devirt 0xFF000000 -> 4278190080
Should look something like this when done: